You can customize the Dentrix Enterprise toolbars to show only the buttons that you use most frequently.
Note: Customizing classic toolbars requires the "Customize Toolbars" security right.
To customize a toolbar
In any Dentrix Enterprise module (such as Family File, Chart, Ledger, Appointment Book, and Office Manager) with a classic toolbar, do any of the following as needed:
To remove a button from the toolbar of the current module, right-click the button, and then click Remove Button.
Note: You can restore the button later if needed.
To remove a separator from the toolbar of the current module, right-click the empty space between buttons on the toolbar, and then click Remove Separator.
Note: You can restore the separator later if needed.
To arrange, remove, and add buttons and separators for the toolbar of the current module, right-click anywhere on the toolbar, and then click Customize Toolbar.
If applicable, do one of the following:
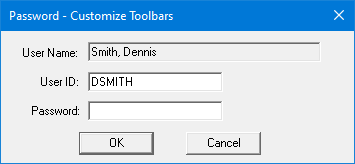
If the Password - Customize Toolbars dialog box appears, user verification has been assigned to the "Customize Toolbars" task. Do one of the following:
If your user account has been granted the "Customize Toolbars" security right, enter your credentials in the User ID and Password boxes, and then click OK.
If your user account has not been granted the "Customize Toolbars" security right, have a user with permission temporarily override this restriction so you can customize a classic toolbar this one time. The overriding user enters his or her credentials in the User ID and Password boxes and then clicks OK.

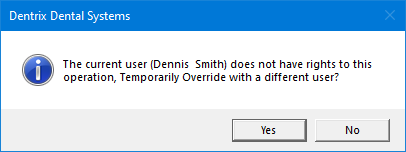
If a message appears, informing you that you do not have rights to this operation, your user account has not been granted the "Customize Toolbars" security right. To have a user with permission temporarily override this restriction so you can customize a classic toolbar this one time, do the following:
On the message, click Yes.

In the Password - Customize Toolbars dialog box, the overriding user enters his or her credentials in the User ID and Password boxes and then clicks OK.

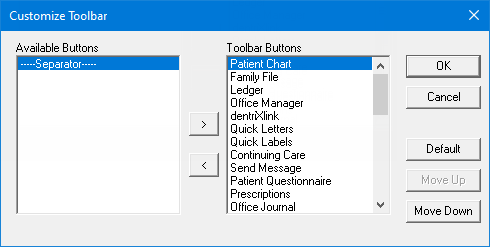
If you clicked Customize Toolbar in step 1, the Customize Toolbar dialog box appears; otherwise ignore the remaining steps.

Customize the toolbar using any of the following methods:
Adding a button to the toolbar - In the Available Buttons list box, select the name of the button you want to add, and then click the right arrow button (>). The button name is moved to the top of the Toolbar Buttons list if the first item is selected in the Toolbar Buttons list, or the button name is moved to the position above the selected item in the Toolbar Buttons list. The button will now show on the toolbar in the current module (the change only affects the toolbar you are customizing).
Removing a button from the toolbar - In the Toolbar Buttons list, select the name of the button you want to remove, and then click the left arrow button (>). The button name is moved to the top of the Toolbar Buttons list box if the first item is selected in the Toolbar Buttons list, or the button name is moved to the position above the selected item in the Toolbar Buttons list. The button will now show on the toolbar in the current module (the change only affects the toolbar you are customizing).
Inserting a separator on the toolbar - Separators are used to separate one set of buttons from another set. In the Toolbar Buttons list, select the name of the button where you want to insert a separator (an empty space on the toolbar), select "----Separator----" in the Available Buttons list, and then click the right arrow button (>) to copy the separator to the Toolbar Buttons list. the separator is inserted above the selected button name, which indicates that, on the toolbar, the separator will appear to the left of the selected button. The separator will now show on the toolbar in the current module (the change only affects the toolbar you are customizing). You can add as many separators as you want.
Removing a separator from the toolbar - In the Toolbar Buttons list, select the separator you want to remove, and then click the left arrow button (<). The separator is removed from the Toolbar Buttons list. The separator will not show on the toolbar in the current module (the change only affects the toolbar you are customizing).
Arranging a button or separator on the toolbar - In the Toolbar Buttons list, select the name of the button or separator you want to move, and then click the Move Up or Move Down button to move the button or separator up or down. Keep clicking the Move Up or Move Down button until the button or separator appears in the desired position. The button or separator will now show in the new location on the toolbar in the current module (the change only affects the toolbar you are customizing).
Restoring the defaults - Click Default if you want to restore all the buttons and separators to their original default positions (the positions from the initial installation of Dentrix Enterprise). The change only affects the toolbar of the current module.
Click OK.